

Download PDF
Click here to download a PDF with this information.
Offender Alert Settings Guide With Visitu
This guide provides step-by-step instructions for enabling and configuring the Offender Check feature in your Visitu portal. This feature enhances campus security by checking visitors against the National Sex Offender Public Registry (NSOPR) database and alerting designated staff members if a potential match is found.
Navigate To Security Settings
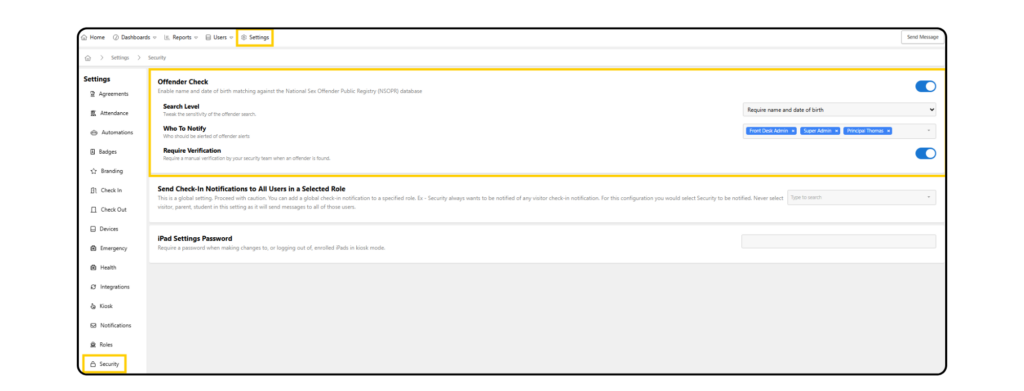
- Click on Settings in the top navigation bar; scroll down and click Security.
Enable The Offender Check Feature
- At the top of the Security page, locate Offender Check. Click the toggle switch to enable the feature.
Set The Search Level
- The Search Level determines the criteria used to match a visitor against the database.
- Click the dropdown menu and select an option. We recommend using require name, date of birth, and state for the most accurate results and to minimize false positives.
Designate Who To Notify
- In the Who To Notify field, you will specify which staff members receive an email and/or push (or text) alert when a potential offender is identified. You can add individual users by typing their names.
- Best Practice We strongly recommend creating a suer Role named “Security” (or similar) and assigning all relevant personnel to it. You can then add the “Security” role to this notification box. This makes it easier to manage who receives alerts without having to add or remove individual names manually.
Require Manual Verification
- Ensure the Require Verification toggle is enabled (this is the default and recommended setting).
- When a potential match is found, this feature will discreetly stop the check-in process on the kiosk and display a message instructing the visitor to “please see the front desk”, allowing your staff to handle the situation privately.
Once these settings are configured, click the Save button at the top right of the page to apply your changes.
Visitors Flagged By Offender Alert With Visitu
This guide explains the process that occurs when a visitor’s information triggers an Offender Alert in Visitu. It details the notifications you will receive, how to review the alert, and the steps to either approve or deny the visitor’s entry.
The Offender Alert Is Triggered
When a visitor checks in (either through the Kiosk or manually via the dashboard), their information (name and date of birth) is checked against the National Sex Offender Registry. If a potential match is found, two things happen immediately.
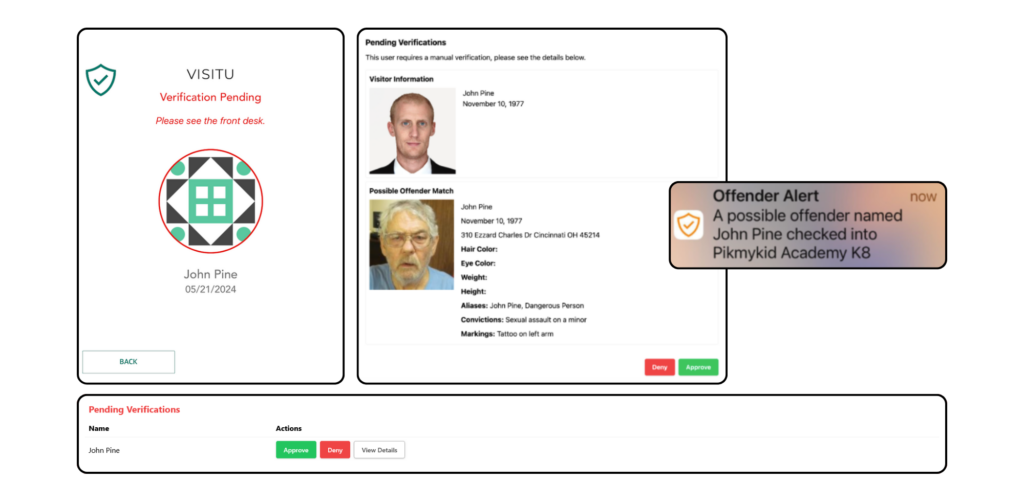
- Kiosk Message If the visitor is checking in on a Kiosk, the screen will display a message asking them to see the front desk for assistance. The check-in process is paused at this point.
- Notifications Are Sent All users who are designated to receive security notifications will receive an immediate email and push alert.
Reviewing The Offender Alert Email
The email alert provides all the necessary information to make an initial assessment. It will include:
- The name of the visitor who triggered the alert.
- The school location where they are attempting to check in.
- A side-by-side comparison of the visitor’s photo (if available) and the photo of the possible offender from the registry.
- Key identifying details for both the visitor and the potential match, such as name, date of birth, and physical descriptors.
- A “View Offender” button that links directly to the pending verification page in your Visitu dashboard.
Verifying The Alert In The Visitu Dashboard
The alert will also appear on your Visitu dashboard, either as a pop-up window or as a “Pending Verifications” banner at the top of the screen.
- Navigate To Pending Verifications Click the banner to Review Details.
- Review The Match The “Pending Verifications” screen provides a detailed, side-by-side comparison:
- Visitor Information Show the name, date of birth, and photo of the person who is checking in.
- Possible Offender Match Displays the name, date of birth, physical details (hair color, eye color, etc), address, and any known aliases or convictions for the potential match from the registry.
Taking Action: Approve Or Deny
After carefully comparing the information, you must decide whether to approve or deny the visitor’s entry. It is highly recommended that your campus establish a clear internal process for approving or denying visitors who flagged by the Offender Check.
- To Approve The Visitor If you determine that the visitor is not a match, click the green Approve button.
- This action dismisses the alert and allows the visitor to complete their check-in.
- The visitor will also be added to your school’s Safe List. This prevents them from triggering an alert on future visits, ensuring a smoother check-in experience for them.
- To Deny The Visitor If you confirm that the visitor is a match or if you are uncertain and want to err on the side of caution, click the Deny button.
- This action prevents the visitor from completing their check-in and logs the denial in the system.
- It is important to note that even after being denied, the user will still be listed as “On Campus” in the Visitor Log until they are manually checked out. This is because they are physically present at your location, and to provide you with a log of when that person was on campus, and when they were removed. You must follow your school’s security protocols for handling a denied visitor.
Managing The Safe List
You can view and manage users who have been approved and added to the Safe List.
- Navigate to Users > Safe List.
- Here you will see a list of all users who have been approved after an offender alert was triggered.
- You can remove a user from the Safe List at any time by clicking the trash can icon next to their name. *Removing a user from the Safe List permanently deletes all related history.