

Watch The Video
Download PDF
Click here to download a PDF with this information.
By default, all settings have been configured based on initial feedback from the location Super Admin. Please review these settings to confirm all operations are functioning as intended.
Kiosk
Login to your portal using your unique location URL and then navigate to Settings > Kiosk. Select the pencil icon to view the kiosk layout including the appearance and functionality of your kiosk.
Action Buttons
- Reset Defaults Returns everything to its original state.
- Add Button Incorporates new buttons into your layout.
- Add Icon Choose an icon to enhance your design.
- Add Label Allows you to include descriptive labels.
Editing Content
- In the center of the page, your kiosk layout is displayed. It showcases buttons, icons, and labels that can be modified and added to the layout.
- Click on any button to customize the look and how the button will function.

Attendance Settings
The Attendance Tab is a central hub for managing attendance-related information. To access the Attendance Tab, go to Settings > Attendance – there you’ll find five distinct Reason Tabs: Present, Tardy, Dismissal, Absence, and Check-Out.
Attendance Reasons
The attendance system is designed with dedicated tabs for various attendance reasons, providing a convenient platform to modify and remove different reasons associated with attendance. The key tabs include:
- Present Reasons Indicates the reasons for being present.
- Tardy Reasons Tracks reasons for being tardy.
- Dismissal Reasons Records reasons for early dismissal.
- Absence Reasons Captures reasons for being absent.
- Check-Out Reasons Specifies reasons for checking out and checking back in within the same day (e.g. Dual Enrollment, lunch, etc).
Adding New Reasons
Select a Reason Tab and then click New, initiating the creation of a new reason with specific details tailored to the organization’s needs.
Attendance Reason Details
Each attendance reason comes with detailed information, encompassing:
- Reason Names Describes the specific reason for attendance.
- Optional:
- Roles Specifies which roles will be presented with the reason when using the Kiosk (e.g. student or visitor).
- Notifiables Designates the person to receive notifications when the reason is utilized.
- Please Note We do not recommend selecting the ‘Parent’ role when creating a reason. Guardians, by default, will receive a notification about their student’s attendance. If you choose to select the ‘Parent’ role for who to notify, ALL parents will receive notification about individual student attendance entries.
Time-Based Tardy Or Early Release Reasons
For schools that need to limit or show attendance reasons based on the time of day, (i.e. state auditing purposes) time-based reasons can be created. This setup prevents students from accidentally selecting the wrong season and ensures your attendance exports or report-card audits stay accurate. It also reduces manual cleanup of attendance records.
When creating a time-based reason, select the Reason Tab and then click New.
- Start Time Displays the start time for the attendance reason.
- End Time Shows the expiration time for the attendance reason.
- Integration Type If SIS writes back, also select ‘Integration Type’ when customizing the reason.
Track Attendance Settings
The Track Attendance Settings section allows you to tailor the attendance tracking system to meet your organization’s needs. Here’s a breakdown of the available settings:
- Track Attendance Activate or deactivate the overall attendance tracking feature.
- Use Current Time For Attendance Override reported or scheduled time with the current time when confirming attendance.
Student Guardians, Student Codes & Scheduling Via Mobile App
The following settings contribute to student and guardian interactions:
- Student Guardians Enables guardian accounts to be linked to student accounts. This feature facilitates a connection between students and their designated guardians, enhancing communication channels.
- Student Codes Enables students to link to guardian accounts via randomly generated secure codes. This feature ensures a secure and straightforward process of connecting students with their respective guardians. Additionally, guardians can sign up via the self-service sign-up page on campus.visitu.com/guardian.
- Scheduling Via Visitu Mobile Allows guardians to schedule student absences, tardies, and early dismissals conveniently through the Visitu Mobile App. By activating this feature, you empower guardians with the ability to manage and schedule various attendance-related events on the go. Staff will need to approve mobile submitted attendance in the Attendance Dashboard to keep integrity between the school, parent, and student records.

Attendance Reports
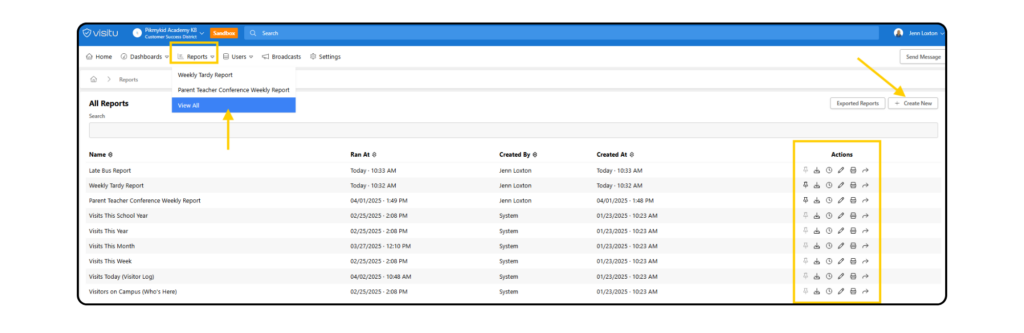
From the reports dashboard, custom reports can be created for specific content and information. To access data & reports related to Attendance, click on Reports > View All from the menu on the home screen.
- Click + Create New button on top right of dashboard
- Name the Report (e.g. Weekly Tardy Report)
- Select a Report Type from the attendance options
- Identify a Date Range – choose custom to select specific dates
- Optional: Add Additional Filters to refine the search even further (e.g. by reason)
From the report dashboard, reports can be pinned to the Report dropdown for quicker access, or scheduled to be emailed to a specific staff member at a certain time or date.
Creating A Single Sign-On With Visitu & Pikmykid
School users who need to access both the Visitu & Pikmykid portals can enable a single sign-on through the Visitu portal, allowing users to toggle between the two platforms as needed.
Getting Started
- Log into the Visitu Portal.
- Click on the school name dropdown on top left of screen. Select Validate Email Address.

- Confirm Email using the Validation Code (will be sent to email associated with your Visitu Account).

- Click on school name dropdown again & choose Open Pikmykid Portal.

- To access Visitu from the Pikmykid Portal, select the Visitu icon on the bottom left.
