Download PDF
Click here to download a PDF with this information.
This guide provides step-by-step instructions on how to create custom reports, view the data, and schedule them for automatic email delivery.
Accessing The Reports Page
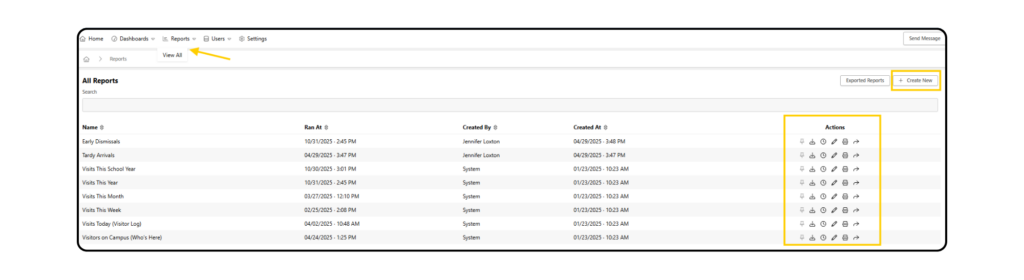
- From your main dashboard, click the Reports dropdown menu in the top navigation bar. Select View All to go to the list of all created reports.
Creating A New Custom Report
- From the “All Reports” page, click the + Create Report button in the top-right corner.
- You will be taken to the “Create Report” form. Fill it out as follows:
- Name Give your report a clear, descriptive name. For example, Attendance – Year.
- Report Type Select the category of data you want to report on.
- Common types include: Visits, Attendance, Surveys, Notifications & Activity.
- Date Range Choose the time period for the report. You can select a preset such as This School Year or choose Custom to enter a specific start and end date.
- Filters (Optional, but Recommended) Use filters to narrow down your data.
- Click Add Filter.
- In the pop-up, choose a Filter Type (e.g. filter by role, filter by reason).
- Select the specific value for your filter (e.g. for a role filter, you might choose Students).
- Click Add to apply the filter. You can add multiple filters to a single reprot.
- Pin Report (Optional) Check this box to add a quick-access link to this report under the main “Dashboards” dropdown menu.
- Once you have configured your report, click Save.
Managing & Using Your Reports
After saving, you will be returned to the “All Reports” page where your new report will be listed. You can perform several actions on any report directly from this list from the Actions column.
- Pin Report Pins the report to the Reporting dropdown in the navigation bar for quicker access.
- Download Report Immediately downloads the report data as a file (e.g. CSV or Excel).
- Schedule Report Opens a window to set up automatic email delivery of the report.
- Edit Report Allows you to change the report’s name, date range, or pin settings.
- Print Report Opens your browser’s print dialog to print the report data.
- View Report Opens the report to display the live data in table format.
- When viewing a report, you can also access these actions (Info, Edit, Schedule, Download, Print) from the buttons at the top of the report page.
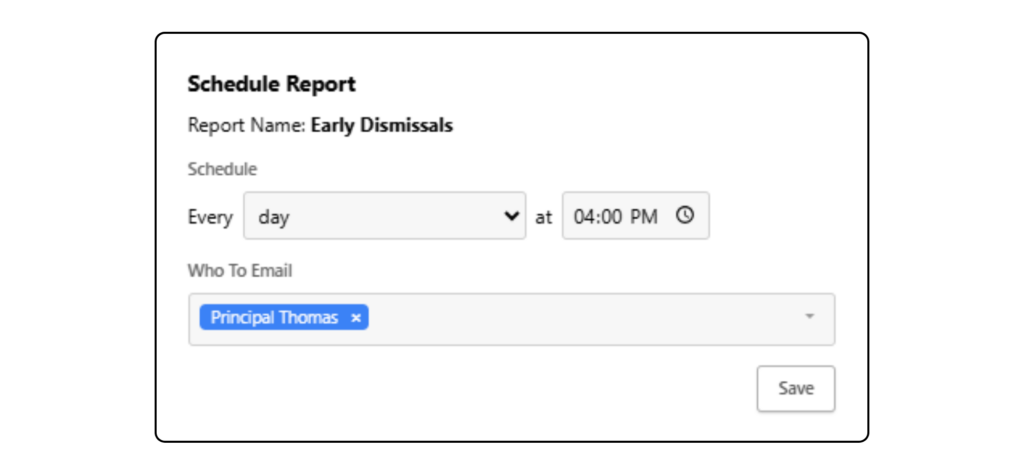
Scheduling A Report For Email Delivery
You can automate your reporting by scheduling a report to be emailed to specific staff members on a recurring basis.
- Find the report you want to schedule in the “All Reports” list and click the Schedule Report (clock) icon.
- Click Add New and configure the schedule:
- Frequency Choose how often the report should be sent from the dropdown (e.g. Monday, Wednesday, Friday, Week, Month).
- Time Set the time of day you want the report to be sent (e.g. 08:00 AM).
- What To Email Start typing the name of a staff member or role to select recipients. You can add multiple schools if needed.
- Click Save to activate the schedule.