

Download PDF
Click here to download a PDF with this information.
Creating & Managing Roles With Visitu
This guide provides instructions on how to create, edit, and manage user roles within your Visitu portal. Roles are a powerful tool for controlling the permissions and capabilities of different types of users, such as staff, students, and visitors.
Navigating To The Roles Page
All role management is handled in the settings area of your dashboard.
- Click on Settings in the top navigation bar and from the menu on the left, scroll down and click on Roles.
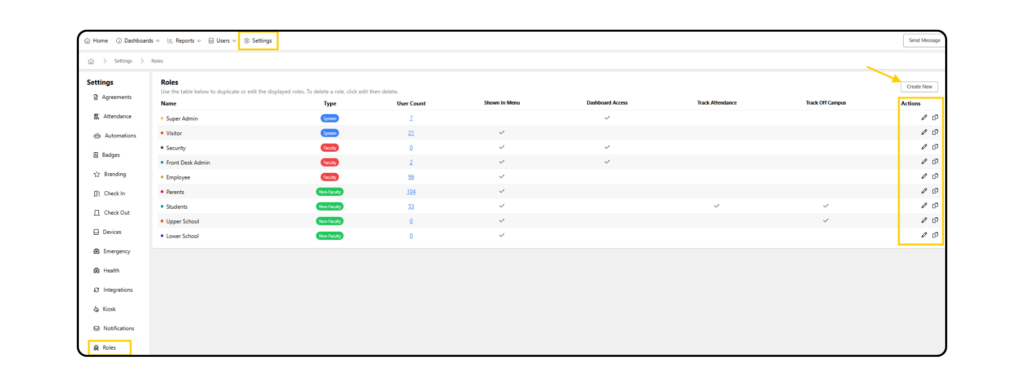
The Roles Management Page
On this page, you will see a list of all existing roles in your system. The table provides an at-a-glance view of each role, including its name, type, the number of users assigned to it, and key permission statuses. From here, you can:
Create A New Role
- Click The Create Roll button in the top-right corner.
- Create Name Enter a clear, descriptive name for the new role (e.g. “Front Desk Admin”, “Substitute Teacher”).
- Determine Type Choose a type from the dropdown. This is a critical setting:
- Faculty Select this type for any role that may need access to the Visitu dashboard.
- Non-Faculty Select this for roles that will never need to log in to the dashboard (e.g. Visitors, Contractors).
- Click Save You will be taken to the “Edit Role” page to configure the new role’s specific settings.
Edit An Existing Role
- Click the pencil icon in the “Actions” column next to any role to open its settings page.
- Basic Information You can change the role’s Name and assign a Color for easy visual identification throughout the dashboard.
- Integration Options If you use an SIS integration, this section allows you to map roles from your SIS to this Visitu role.
- Custom Fields Click Add Field to require specific information from users assigned to this role (e.g. a phone number, a custom text field for a department name, etc).
- Permissions This is a comprehensive list of features that you can enable or disable for the role by clicking the toggle switches. This controls what users in this role can see and do within the platform.
- Dashboard Access This is a key permission. Enabling it grants users with this role the ability to log in to the Visitu dashboard. Once enabled, a detailed list of administrative permissions appears, allowing you to grant granular access to different parts of the dashboard.
- Delete Role At the bottom of the page is a Delete button. Clicking this will permanently remove the role from your system. This action cannot be undone.
Assigning Role(s) To A User
- Use the main Search bar at the top of the page to find the user you wish to assign the new role to.
- Click on the user’s name form the search results to open their profile.
- On the user’s profile page, click the Edit tab.
- Scroll down to the Roles field.
- Click inside the field and select the new role (e.g. “Front Desk Admin”) from the list. A user can have multiple roles assigned.
- Click the Save button at the bottom of the page.

The user will now have the permissions associated with the new role. When you save, you may see an option to send the user a welcome email, which will grant them access to the dashboard if they did not have it previously.
Managing A User’s Profile With Visitu
This guide provides a comprehensive overview of the user profile page in Visitu. Understanding this page is essential for managing user data, viewing activity & performing various administrative actions.
Finding A User
The quickest way to access a user’s profile is through the global search bar at the top of your dashboard.
- Click on the search bar and type the user’s first name, last name, email, or phone number.
- Select the correct user from the search results to open their profile page.

User Profile Page
The User Profile Page is organized into two main sections: an action panel and a central content area with multiple tabs.
Action Panel
This area contains the user’s name and profile picture, along with a list of quick actions you can perform.
- Check In Manually checks the user into the school.
- Take Photo Use a connected webcam to capture a new profile photo for the user.
- Add To Watch List Quickly add users to the internal Watch List.
- Register Visit Pre-registers a future visit or appointment for the user.
- Send Invite Email Sends an email to the user with a link to set up their dashboard password (for staff and other roles with login privileges).
- Clean User Data Allows you to selectively delete data from a user’s profile, such as past visits or photos. Use this action with caution.
- Suspend User Temporarily revokes a user’s access rights. You can provide a reason, internal notes, and an expiration date for the suspension.
Central Content Area (Tabs)
This section provides detailed information related to the user’s history and profile data.
- Visits Tab Displays a log of all the user’s past visits, including time in, time out, visit length, and reason.
- Surveys Tab Shows the results of any surveys the user has completed during check-in.
- Students Tab For users with a “Parent” role, this tab lists all students they are associated with.
- Badge Tab Displays the user’s QR code badge, which can be used for quick check-ins at a kiosk. From here, you can Download the badge, Send it to the user via email/text, or Revoke it to issue a new one.
- Documents Tab Contains records of the user’s scanned ID and any agreements they have signed.
- Activity Tab A comprehensive log of all activities associated with the user, including check-ins, check-outs, and attendance records.
- Edit Tab This is where you can manually update the user’s profile information.
- User Details Change the user’s name, email, phone number, address, or upload a photo.
- Roles Assign or remove roles (e.g. Parent, Super Admin, Employee) to control the user’s permissions and capabilities.
- Notifications Configure notification preferences, such as enabling email or forcing SMS messages for mobile app users.
- Save/Delete Remember to click Save after making any changes. You can also permanently Delete the user’s account from this screen. *Caution: Deleting a user will remove all historical data for the user.
