

Download PDF
Click here to download a PDF with this information.
Printer Setup Guide With Visitu
BROTHER QL-820NWBC
Choosing Your Connection Method
Before starting, decide which connection method best suits your environment.
- Bluetooth (Recommended) for simplicity, mobility, or when network issues prevent a stable Wi-Fi connection. This creates a direct, one-to-one link between the iPad and the printer.
- Wi-Fi (Infrastructure Mode) can be used with stationary printers in a location with a stable wireless network. This method allows the printer to be a shared resource on your network.
Setup Via Bluetooth (Recommended)
Step One: Configure the Printer for Bluetooth
- Press the [Menu] button on the printer.
- Use the arrow keys to navigate to Bluetooth > Bluetooth (On/Off).
- Select On and press [OK].
- In the Bluetooth menu, find Automatic Reconnection and set it to On. This is crucial for maintaining a stable connection.
Step Two: Pair the Printer with the iPad
The connection is managed in the iPad’s main settings, not inside the app.
- Open the Settings app on your iPad.
- Tap Bluetooth.
- In the “Other Devices” list, look for your printer (e.g. QL-820NWBc). Tap it to pair.
- The printer will move to the “My Devices” list, and its status will show “Connected”.
Step Three: Connect Within the App
Once the iPad is connected, the app can use that connection.
- Open the app and go to the settings and go to the Badge Printer.
- Your printer, now paired with the iPad, will appear in the “Available Printers” list.
- Tap on it to save it to your “Paired Printers” list.
Step Four: Bluetooth Troubleshooting
If the connection is unstable or fails, the best solution is to reset the pairing.
- On the iPad, go to Settings > Bluetooth.
- Find the printer in the “My Devices” list and tap the “i” icon next to it.
- Tap “Forget This Device” and confirm.
- Turn the printer’s Bluetooth off and on again.
- Repeat Step Two to re-pair the device from scratch.
Setup The Wi-Fi Network
Step One: Configure the Printer for Wi-Fi
First enable the printer’s Wi-Fi and set it to the correct mode using its built-in menu.
- Press the [Menu] button on the printer.
- Use the arrow keys to navigate to WLAN and press [OK].
- Go to WLAN (On/Off) and select On.
- Return to the WLAN menu, select Infra/Direct Setting, and choose Infrastructure.
- In the WLAN menu, select Setup Wizard. The printer will search for available networks.
- Choose your network’s name (SSID) from the list and enter the password when prompted. The printer will then connect and receive an IP address.
Step Two: Connect Within the App
The app discovers printers that are on the same network as the iPad.
- Ensure your iPad is connected to the same Wi-Fi network as the printer.
- Open the app and navigate to the printer configuration screen.
- The app will scan your network and list discovered devices under the “Available Printers” section. Your printer should appear here, showing its name and IP address.
- Tap on your printer in the list. The app will save this printer to your “Paired Printers” list for quick access in the future.
Step Three: Wi-Fi Troubleshooting
If the printer does not appear in the “Available Printers” list, it’s typically due to a network setting that blocks device discovery.
- Manual IP Connection The app includes a feature to connect directly to an IP address. If you know the printer’s IP (you can print a configuration page from the printer’s menu to find it), select the “Add Manually” option in the app and enter the IP address.
- Check Network Settings For network administrators, the most common issues are:
- Client/AP Isolation This security feature prevents wireless devices from communicating with each other. It must be disabled on your Wi-Fi access point for printer discovery to work.
- mDNS (Bonjour) Filtering The app uses mDNS for discovery. Ensure your network hardware is not blocking multicast traffic on UDP port 5353.
How To Turn Off “Auto Power Off”
The “Auto Power Off” feature saves energy but can be inconvenient if you need the printer to be ready at all times. Follow these steps to disable it.
- Press the [Menu] button on the printer.
- Use the ↑ and ↓ arrow buttons to scroll to “Settings” and press [OK].
- Scroll to “Auto Power Off” and press [OK].
- You will see options for different power sources. Select “Adapter” and press [OK].
- Use the arrow buttons to select “Off” and press [OK] to confirm. If you use the optional Li-ion battery, repeat steps 3-5, but select “Li-ion battery” instead of “Adapter”.
Enrolling & Setting Up A New Kiosk Device With Visitu
This guide provides the complete process for enrolling a new Visitu Kiosk device (iPad). The process involves two main stages: generating an enrollment code from the Visitu dashboard and using that code to activate the device through the Visitu Kiosk app.
Generating The Enrollment QR Code From The Dashboard
Before you can set up the iPad, you must first generate a unique enrollment code from the Visitu web portal.
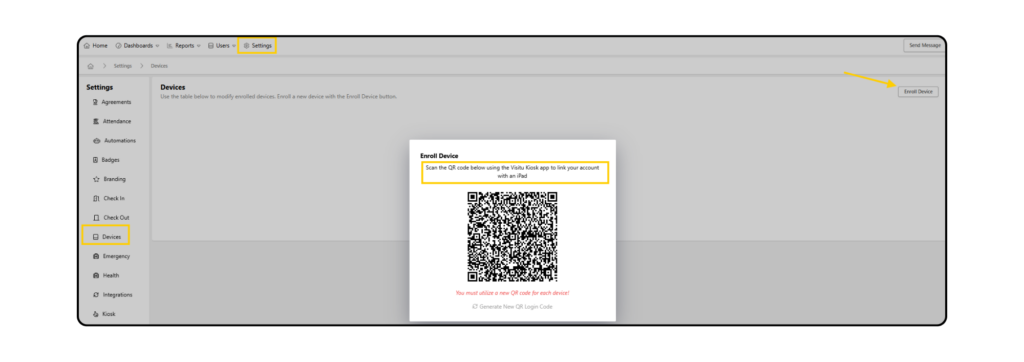
- Navigate To Device Settings
- Log in to your Visitu dashboard and click on Settings in the top navigation bar.
- From the menu on the left, click on Devices.
- Enroll A New Device
- On the Devices page, click the Enroll Device button in the top-right corner.
- A window will appear displaying a unique QR code. This code is required to link the iPad to your school’s account. Keep this QR code visible on your computer screen for the next part of the process.
*Note: If you are enrolling multiple devices (iPads), a new QR code must be generated for each new device you wish to enroll.
Configuring The Kiosk On The iPad
Now, switch to the iPad you wish to enroll as a kiosk.
- Open The Visitu Kiosk App
- Download and launch the Visitu Kiosk app on the iPad.
- On the initial screen, tap Login with QR code.
- Scan The QR Code
- Use the iPad’s camera to scan the QR code that you generated in Part 1. The app will automatically recognize the code and begin the setup process.
- Name Your Device
- You will be prompted to give the device a name (e.g. “Front Desk Kiosk”, “Main Entrance iPad”). This name will identify the device in your dashboard.
- Enter a name and tap Next.
- Connect A Printer (Optional)
- The app will search for available printers on your network.
- If you have a compatible visitor badge printer, select it from the list. If your printer is not found, you can add it manually.
- If you are not using a printer, simply tap Next to skip this step.
- Select Camera
- Choose whether to use the iPad’s Front Camera or Rear Camera to capture visitor photos during the sign-in process. The Front Camera is recommended for most kiosk setups and tap Next.
- Pick An Operating Mode
- You will be asked to choose a default mode for the kiosk. For a standard visitor check-in station, select Kiosk.
- Kiosk Mode Allows visitors, students, and faculty to check themselves in and out.
- Receptionist Mode A mobile version of the dashboard for staff to manage visitors.
- Touch-Free Mode This mode allows for strict configuration of reasons and actions based on device settings. All badges scanned in this mode are automatically processed according to these predefined steps.
- Setup Complete
- After selecting a mode, the setup is complete. The iPad will now display your school’s customized visitor check-in screen and is ready for use.
- The new device will also appear in the device list on your Visitu dashboard (under Settings > Devices), where you can monitor its status.