

Download PDF
Click here to download a PDF with this information.
Managing & Editing The Kiosk Layout With Visitu
This guide explains how to create, edit, and manage the layouts for your Visitu Kiosks. Customizing layouts allows you to control the appearance and functionality of the buttons and icons that visitors, staff, and students interact with on the Kiosk screen.
Navigating To Kiosk Layouts
- Go to Settings and select Kiosk. This will take you to the “Kiosk Interfaces” page, which lists all available layouts.
Creating A New Kiosk Layout
You can create multiple layouts for different purposes or locations (e.g. a “Main Entrance” layout, “Student Attendance” layout).
- On the “Kiosk Interfaces” page, click the Kiosk Layout button in the top-right corner.
- In the “Create Layout” window, give your new layout a descriptive Name.
- Click Submit. The new layout will appear in the list.

Editing A Kiosk Layout
This is where you will customize the look and feel of your kiosk.
- Find the layout you wish to modify in the list.
- In the “Actions” column, click the pencil icon to open the Kiosk Layout editor.
Using The Layout Editor
The editor displays a visual preview of your Kiosk screen with editing tools on the top right.
Adding Elements
At the top of the page, use the Add Button, Add Icon, and Add Label buttons to place new interactive elements onto your layout.

- Moving & Resizing Click and drag any element on the preview screen to reposition it. Use the handles on the corners and sides of an element to resize it.
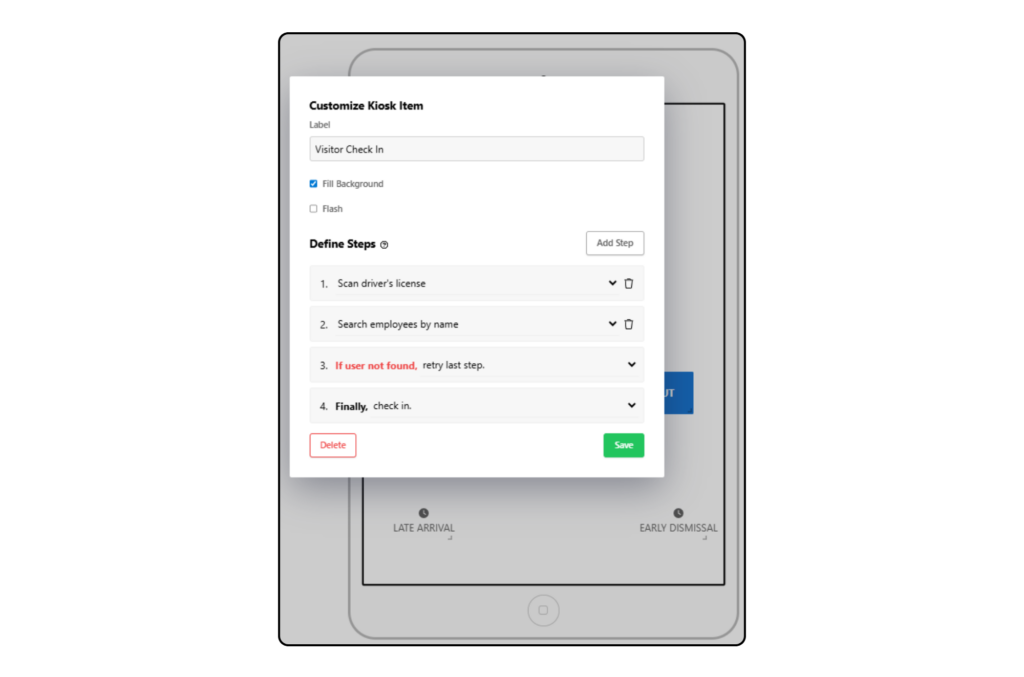
- Editing Elements Click on any button, icon, or label on the preview screen to open its customization options. Here, you can:
- Change The Label Edit the text that appears on the button or icon.
- Customize Appearance For buttons, you can choose between a “Fill Background” style or an outline. You can also make a button “Flash” to draw attention.
- Define Steps (Workflow) This is the most critical part of the configuration. For each button or icon, you define a series of steps that the user will follow. You can add, reorder, or delete steps to create a custom check-in or check-out process. Example steps include “scan driver’s license” or “search all users”.
- Resetting To Defaults If you want to start over, click the Reset Defaults button to revert the layout to its default state. *Note: This will revert to the last saved state. This will reset the layout to its true original form.
- Saving Changes You must click the save button within an element’s edit window to save its configuration. Any changes to the position and size of elements are saved automatically.
Syncing Layout Updates To Your Kiosk
Changes made in the layout editor are typically pushed to your Kiosk devices automatically & quickly.
- If you find that a Kiosk is not reflecting your latest layout changes, you may need to manually refresh it. On the Kiosk iPad, tap the gear icon to open the app settings. Select the option to refresh the device. This will force the Kiosk to refresh the latest layout from the dashboard.
Kiosk Button Workflow Options With Visitu
This guide provides a detailed overview of how to configure the workflows for your Kiosk buttons in Visitu. The “Define Steps” feature allows you to create a custom sequence of actions for any button, tailoring the check-in process to meet the specific needs of your school and different user types.
Understanding Kiosk Workflows
Every button on your Kiosk is powered by a workflow – a series of steps that the system executes when a user taps that button. By customizing these steps, you can create a wide range of automatic processes, from a simple visitor check-in to a multi-step student dismissal.
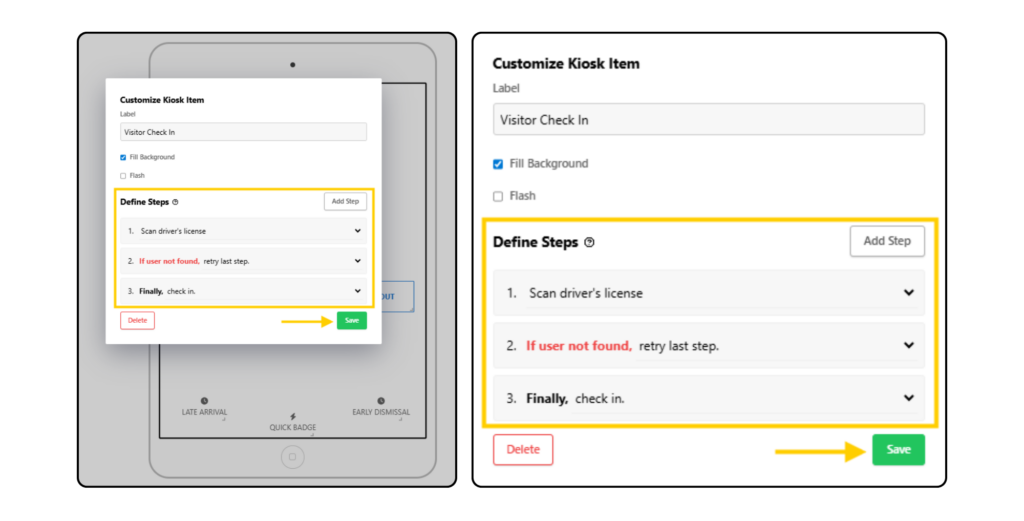
A typical workflow consists of three main parts:
- User Identification The initial steps that determine how the user identifies themselves (e.g. by scanning an ID, typing their name).
- Conditional Logic A step that defines what happens if the user is not found in the system.
- Final Action The final step that completes the process (e.g. checking the user in, marking a student as tardy, displaying a list of children).
The Workflow Step Builder
To create workflow options, start by going to Settings and click Kiosk along the sidebar menu. Click on a button in the Kiosk Layout editor to edit. There you will see the “Define Steps” section and this is where you build your workflow. You can add, remove, and reorder steps to create your desired process.
Breakdown Of Available Workflow Options
User Identification Steps
These steps are typically used at the beginning of a workflow to find a user’s profile.
- Search By Name Prompts the user to type their name. You can narrow the search to specific roles (e.g. search parents by name, search employees by name).
- Search By Unique Prompts the user to enter a unique identifier, such as a Search phone number.
- Search By Document Uses the iPad’s camera to scan a physical item.
- Scan Driver’s License Scans the barcode on a driver’s license to find a match.
- Scan Badge Scans a Visitu Quick Badge or a previously printed visitor badge.
- Search By Other
- Search Active Visitors Limits the search to only users who are currently checked in. This is most commonly used for check-out buttons.
- Create New These steps immediately begin the process of creating a new user profile for a specific role (e.g. create new visitor, create new parent).
Conditional Logic Steps (“If User Not Found…”)
This step determines what the Kiosk does if the initial search does not find a match.
- Retry Last Step Prompts the user to try their search again. This is the most common option.
- Return Home With Error Ends the workflow and displays an error message.
- Create New Visitor Automatically starts the new visitor registration process if the initial search fails.
Final Action Steps (“Finally…“)
This is the last step in the workflow and defines the final action the Kiosk will take.
- Check-In/Check-Out Simple, direct actions to either check a user in or check them out.
- Attendance Actions Mark a user with a specific attendance status, such as mark as tardy, mark as dismissed, or mark as absent.
- Display Information
- Display Options Presents the user with a list of choices. You can configure which options are available (e.g. allow a user to choose between “Tardy” and “Dismissal”).
- Display Children For users with the “Has Children” permission (e.g. Parents), this will show a list of their associated students, allowing them to select one or more to check out.
By combining these steps in different orders, you can create workflows that are perfectly suited to your school’s unique processes.